

I really like the smooth articulation. But can I have some staccato attack when I play loud or more aggressively?
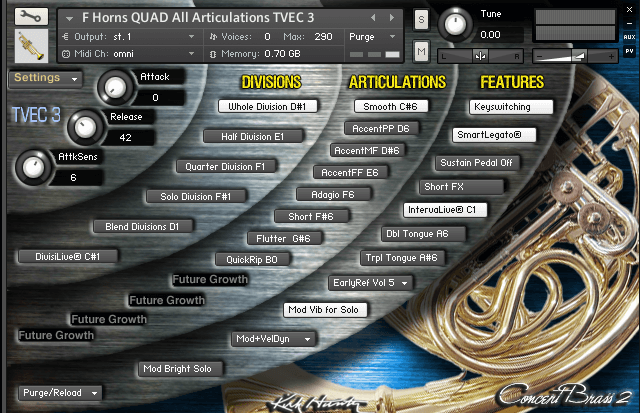
Yes. Choose any of the Accented articulations, and then raise the value of the AttkSens knob to about 5 or greater. Now, when you play more aggressively, you'll hear a sharp staccato. And of course, you can change the style of staccato to "loose" or "tight" instantly via automation or keyswitching.
I want to play polyphonically without the true legato feature offered by SmartLegato®.
Simply turn off SmartLegato® by clicking the SmartLegato® button on the front of the GUI, and you will be able to play in full polyphony. You should note that SmartLegato® is very flexible in that it allows you to play chords while still getting the benefits of true legato technology.
I'd rather not hear the true intervals offered with IntervaLive®.
Simply turn off IntervaLive® by clicking the IntervaLive® button on the front of the GUI, and you will be able to play in full polyphony. By default, IntervaLive® is also engaged/disengaged by keyswitching at C1.
I want to be able to play faster during legato.
1. Choose Settings > •Set IntervaLive® features for when you play overlapping notes. When on, you will hear true intervals between overlapped notes.
2. Set the "int Space" knob to low values. -100 plays with hardly any interval heard. +100 is good for very slow, lush phrases.
I don't want to hear intervals between smaller intervals such as half or whole steps.
1. Choose Settings > •Set IntervaLive® features for when you play overlapping notes. When on, you will hear true intervals between overlapped notes.
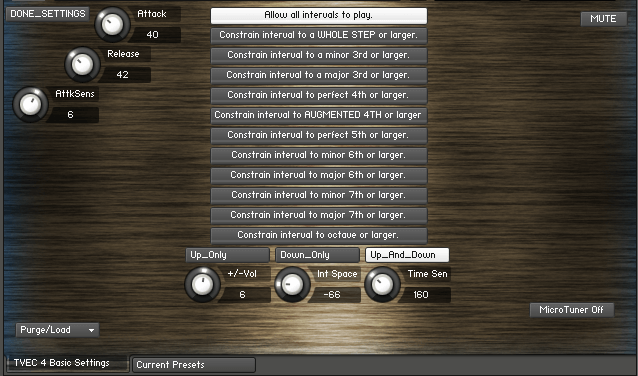
2. Choose "Constrain intervals to perfect 4th or larger." Or you can constrain the intervals to any size you wish.
I want to hear the intervals, but only when ascending.
1. Choose Settings > •Set IntervaLive® features for when you play overlapping notes. When on, you will hear true intervals between overlapped notes.
2. Choose "Up-Only"
I want to hear the intervals, but only when descending.
1. Choose Settings > •Set IntervaLive® features for when you play overlapping notes. When on, you will hear true intervals between overlapped notes.
2. Choose "Down-Only"
I want to hear the intervals, both ascending and descending.
1. Choose Settings > •Set IntervaLive® features for when you play overlapping notes. When on, you will hear true intervals between overlapped notes.
2. Choose "Up_And_Down"
The sound of the intervals is too loud.
1. Choose Settings > •Set IntervaLive® features for when you play overlapping notes. When on, you will hear true intervals between overlapped notes.
2. Set the +/-Vol knob to control the volume of the intervals.
I don't want to hear the intervals if I'm playing very fast.
1. Choose Settings > •Set IntervaLive® features for when you play overlapping notes. When on, you will hear true intervals between overlapped notes.
2. Set the Time Sens knob. Raising the value of this knob actually LOWERS the threshold of time sensitivity. So if you were to raise the value of this knob all the way, you would hear the intervals only when you play very very slowly. Lowering it all the way would cause you to hear intervals no matter how fast you play.
Normally, when I'm using SmartLegato®, and IntervaLive® is on, the sound seems to have a nice, "tongued" effect. If this is true, can I also get a slur if I so choose?
Yes. To do this, just hold down the sustain pedal during your performance. By default, the sustain pedal is set to slur notes during IntervaLive®.
When I use the sustain pedal, I see that the GUI shows "Slurring…" when I'm playing intervals. But sometimes, I see the GUI show "Extending…". What does this mean?
By default, not only will the sustain pedal slur legato notes, but it will also extend notes that are repeated. This way you can get a really effective and smooth musical phrase that is consistent with the legato.
What if I want to use the sustain pedal conventionally, and just hold the notes I play?
1. Choose Settings > •Set SmartLegato® and Sustain Pedal features.
2. Set the Overlap knob all the way up to 2200. Now, the sustain pedal will behave conventionally.
When I'm using the Smooth articulation, and playing legato, it sounds ok. But when I change to any of the Accented articulations, the attack is too slow.
1. Choose Settings > •Set SmartLegato® Attack.
2. If you set the value of the LegAttk knob down to 0, then the attack of the accented articulations will be just as strong even when you play legato. (Of course this also depends on the setting you chose for the AttkSens knob.) If you raise the value a little, then the attack of the AccentFF articulation will match that of the Smooth articulation when you play legato. This will also be true of the AccentMF and AccentPP articulations. However, as you raise the LegAttk value, the attacks for the AccentMF and AccentPP articulations will get slower and slower until they match that of the AccentFF articulation.
When I choose QuickRip, I don't hear anything.
You need to have first played a note that is lower than the note you are trying to engage the rip on. After that you can engage the QuickRip. Additionally, you can play the QuickRip repeatedly at this point. By default, QuickRip is also engaged/disengaged by keyswitching at B0.
The rips are not loud enough.
1. Choose Settings > •Set Rip Levels
2. Set the volume of the rips with the Rips Level knob.
I want to have only the modwheel control the volume.
1. Choose Settings > •Set velocity volume, modwheel volume, velocity dynamics and modwheel dynamics.
2. Set Vel Vol to 0.
3. Set Modwhl Vol to anything greater than 0. The higher this value the more range of modwheel control over volume.
Note that volume is different than dynamics. See "I want to have only the modwheel control the dynamic layers." below.
I want to have only velocity control the volume.
1. Choose Settings > •Set velocity volume, modwheel volume, velocity dynamics and modwheel dynamics.
2. Set Modwhl Vol to 0.
3. Set Vel Vol to anything greater than 0. The higher this value the more range of velocity control over volume.
Note that volume is different than dynamics. See "I want to have only velocity control the dynamic layers." below.
I want to have both velocity and the modwheel control the volume.
1. Choose Settings > •Set velocity volume, modwheel volume, velocity dynamics and modwheel dynamics.
2. Set Modwhl Vol to anything greater than 0. The higher this value the more range of modwheel control over volume.
3. Set Vel Vol to anything greater than 0. The higher this value the more range of velocity control over volume.
Note that volume is different than dynamics. See "I want to have both velocity and the modwheel control the dynamic layers." below.
I want to have only the modwheel control the dynamic layers.
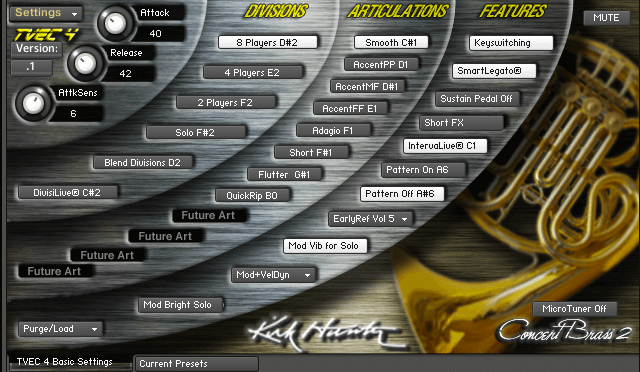
There is a small drop-down menu on the front of the GUI that is, by default, set to "Mod+VelDyn". With this menu, you can control crossfading from one dynamic layer to the next.
From this menu, choose "Mod Dyn".
I want to have only velocity control the dynamic layers. With this menu, you can control crossfading from one dynamic layer to the next.
There is a small drop-down menu on the front of the GUI that is, by default, set to "Mod+VelDyn".
From this menu, choose "Vel Dyn".
I want to have both velocity and the modwheel control the dynamic layers. With this menu, you can control crossfading from one dynamic layer to the next.
There is a small drop-down menu on the front of the GUI that is, by default, set to "Mod+VelDyn".
Make sure that this menu is set to "Mod+VelDyn".
Do you offer modwheel vibrato for the solos?
Yes.
Click "Mod Vib for Solo" on the front of the GUI. Now, when you play the solo division, you will add vibrato via the modwheel. However, you should note that you will also hear other settings via the modwheel depending on your modwheel settings such as modwheel volume or modwheel brightness, etc.
I clicked "Dbl Tongue", and "Trpl Tongue" which I assume mean "double-tongue" and "triple-tongue" respectively. When I play, I am not sure of what I am hearing.
Double and Triple Tongue features operate on release notes. So you will likely have to practice a bit to get the "feel" of how they work. Also, you should choose an accented articulation such as AccentMF.
I chose "Short FX", but don't hear anything unusual? Should I? Also, I see a little button slightly overlapping the "Short FX" button? What's that?
You need to have chosen the "Short" articulation to hear the effect. This is just a simple "fall" or "scoop" effect for certain special types of musical phrases. The little overlapping button tells the effect to either "fall" from, or "scoop" to the note you play.
I've loaded 2 TVEC 3 instruments in a multi, and have assigned both to the same MIDI channel. This is because I want to play both of the instruments at the same time. However, in terms of adding a slight delay, I'd like to offset one of the instruments from the other so as to create a more "human" sounding performance. Can I do this?
Yes.
1. Choose Settings > •Set Instrument Delay Amount.
2. Set the Delay knob. Higher values result in more of a delay of the instrument's performance. Additionally, this delay, once set higher than 0, is slightly randomzed for even more realism.
I would like to assign my own keyswitch maps. Can I do this?
Yes.
1. Choose Settings > •Assign/View Keyswitch Notes. You will see a keyswitch map that shows the current settings. You will also see a drop-down menu from which you can choose exactly what feature, articulation or division (section) you would like to assign, along with the actual assignment.
2. From the feature's, articulation's, or division's assignment just choose a midi note number. As you do so, you will see that change reflected in the current keyswitch map. Please note that the assignments for staccato style, QuickRips, and IntervaLive® cannot be changed. However, you can turn all keyswitch off if you wish. See below, "I'm not a fan of keyswitching."
3. Click "Done_Assigning". If you have assigned more than one feature to the same key, you will get an error message prompting you to fix this. Until you have successfully assigned keyswitches, you will not be able to close the currently-showing windows. Once you are successful, you will see the keyswitch assignments conveniently displayed on each applicable feature's button (if keyswitcing is on). Alternately, you will see the keyswitch assignment vanish from display when you turn off keyswitching.
I'm not a fan of keyswitching. Can I dump the keyswitching altogether?
Yes.
Turn on or off keyswitching by clicking the "Keyswitching" button on the front of the GUI. You will see the keyswitch assignments conveniently displayed on each applicable feature's button if keyswitcing is on. Alternately, you will see the keyswitch assignment vanish from display when you turn off keyswitching.
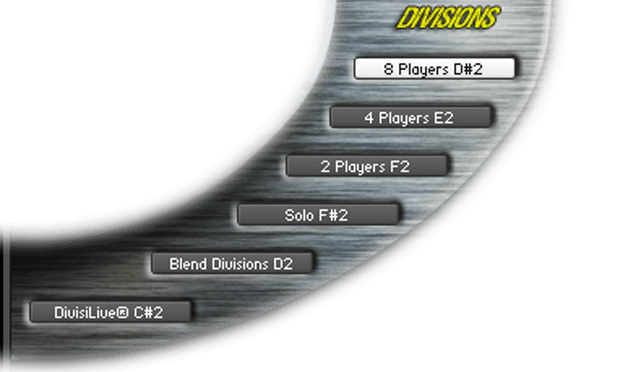
I like being able to have all 4 section sizes loaded in one instrument. I also like that I can blend all of the sections together. But how do I mix the levels of the sections independently?
1. Choose Settings > •Set levels and panning of the different divisions (sections).
2. Set the level of any of the 4 sections with the knobs in the left column.
I like being able to have all 4 section sizes loaded in one instrument. I also like that I can blend all of the sections together. But can I change the panning of the sections independently?
Yes
1. Choose Settings > •Set levels and panning of the different divisions (sections).
2. Set the panning of any of the 4 sections with the knobs in the right column.
When I turn on DivisiLive® I don't hear a difference between when I play a 2-note chord or a 3 or 4-note chord.
DivisiLive® divides the currently-selected divsion (unless you chose the solo division) down to the next lowest division. So if you selected the Whole division and play a chord, you'll always get the Half division during those chords. Similarly, if you selected the Half division and play a chord, then you'll always get the Quarter division during chords. And of course, it follows that if you selected the Quarter division, then you'll always get the Solo division during chords.
I sometimes get a script warning of a wrong time parameter.
Research is being done to address this. However, this error does not cause any known performance issues.
(Downloadable Files)
Concert Brass 2 gives you 4 brass libraries in one. Coupled with innovative and progressive TVEC 3 and TVEC 4 programming for Kontakt, you will not find a more flexible and playable great sounding brass library at this price! And with SmartLegato2®, you will be able play chords in legato mode even while changing articulations! With these new brass sections, you can call up anything from a huge "Hollywood" film sound, to an intimate brass chorale or solo or anything in between! Musical expression was key in recording new sections. You'll be able to get big bombastic fanfares, easy to control crescendos or "spooky" and dark backgrounds. The range of programming variety you get is limitless. All of these new sections were sampled in a space large enough to get the "sweet spot" for brass, yet not so ambient that you're stuck with a mushy sound. This way you can choose your own style of ambience without conflicts.
Please be sure to read the requirements tab for this library.
- A working knowledge of how to use Kontakt.
- 22GB disk space
- FULL version of Kontakt 6.6.1 or newer (not the "player" version).
- Download links expire in 6 months.
Click HERE to see a table of all libraries compared to each other.
INSTALLATION
- Extract the .zip file.
- From within Kontakt, open any .nki (or .nkm file if provided) file.
CLICK BELOW FOR LIBRARY TURORIALS
- Concert Brass 2
- Concert Brass Legacy
- Chamber Strings Adaptive
- Concert Strings Adaptive
- Concert Strings 2
- Concert Strings 3
- Concert Strings Legacy
- Diamond Symphony Orchestra
- Front Row Violins
- Kinetic Brass Plus
- Kinetic Solo & Chamber Strings
- Kinetic Strings Plus
- Kinetic Woodwinds Plus
- Lyric Strings Quintet
- Spotlight Solo Strings 4D
- Virtuoso Ensembles